Here in New England fall is a wonderful time to use leaves as inspiration for drawings and print making.
I do think that photos are the best way to capture the colors for a long period of time. But I can’t resist collecting a few leaves and bringing them back to the studio for inspiration.
Out of all the choices that I had, can you believe that I picked a simple yellow and brown leaf to use as a reference for my sketchbook drawing.
My plan was to fill a sketchbook spread with different variations, inspired by this one leaf. I started with an outline drawing of the basic shapes inside and out.
Then I filled the two pages with similarly shaped leaves overlapping in layering them. I use loose watercolors, markers, and gel pen. I hope I have inspired you to gather a leaf or two, and to make a sketchbook drawing to celebrate the autumn season.
The sale class this month is Draw into Print. In this class, we explore several ways to create trace monotype prints. Read the details on the workshop page.
I have been exploring an even simpler way to incorporate trace monotype prints into my sketchbook.
Sometimes I don’t want to get out a lot of tools and would like a quick little way of making a print.
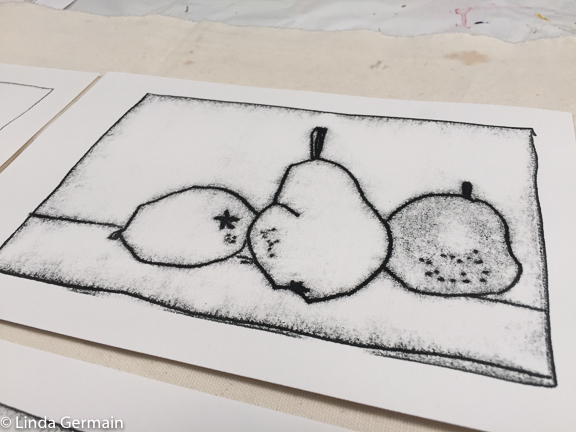
For this simple process, you just need some water soluble oil pastels, wax paper, masking tape and simple line drawings.
The first step is to make some simple drawings on small sheets of paper that you would like to make duplicates of. Do keep the lines, simple, and clear. This process would be more difficult with a very detailed drawing.
To create the transfer paper, we are going to heavily coat the wax paper with a layer of water soluble oil pastel. You could use any color that you like, but to get the traditional, fuzzy line, mark like a trace monotype print, I use black. This trace paper can be used over and over again. You will just need to re-coat it with the water soluble oil pastel every so often.
To make the trace monotype print lightly tape the trace paper onto your sketchbook. “Ink/pastel” side facing down. Then tape your sketch on top of the trace paper and firmly trace over your line drawing. It works like carbon paper of the olden days. 🙂
Be careful to keep the papers in place so that your lines will match up. You may have to experiment with the amount of pressure needed to transfer the line. But I think you’ll be pleasantly pleased with your results.
One benefit of using the water soluble oil pastels is that they are somewhat resistant to watercolor. And I love to accent the drawings with a bit of loose watercolor to complete the image. Hope you enjoy this technique.
Your sketchbook can be a safe place to do nothing or everything. It is a place where you can make marks, sketches, collages and doodles. And nobody else has to see it, unless you want them to.
Recently, I have been working in separate signatures that I put together when they are finished. This way, I can work on several wet pages at once. I like to use inexpensive watercolors and paint circles and stripes and dots. These marks become foundation for other marks.
Sometimes, I will go through and collage a piece of paper on each page just to get started. I often write my angels of the day on a page just to stimulate thought.
I have a bowl of ideas that I can pick a cue card from and get started.
I approach this process in a very nonlinear way. Working randomly through the pages of each signature, as I am inspired to make new marks. I have common motifs that I refer to often. These include birds, flowers, horses, trees, and houses.
Sometimes I start a page with just horizontal or vertical lines.
Despite this random approach, each book is a record of that month’s, inspiration, and ideas. And often it is a cohesive expression, even though it is a very random collection of sketches, drawings and doodles.
I like to use very simple materials like crayons, pens, markers, and inexpensive watercolors.
I have tried several different sizes of pages for this journal, and my favorite is 6″ x 6″. It’s not too big not too small and seems to be the right format for me.
I think the sketchbook ends up being part diary and journal and part sketchbook. I have been using this random sketchbook format for a couple of years now, and have quite a collection. I generally finish about one book a month. Each book is 84 pages long. It is six signatures of 14 pages each. And I glued the signatures back to back to create one book. And then I make a loose sleeve to cover the whole journal.
The stamp making process is quite enjoyable and addictive. You can create several unique stance very quickly that can be incorporated into your sketchbook practice.
How is the summer season influencing your art making? Enjoy!
My sketchbook practice is always evolving. It is kind of funny because I don’t really love to draw, but I find myself choosing to draw and doodle a lot in my sketchbook.
I make a lot of unrelated marks that in the end seem to come together in the end.
I do add plenty of stamped marks and pattern like marks. I collage little bits and pieces here and there and move back and forth through the signatures.
I work up the signatures individually and then glue them together when I have most of the pages done. This way I can keep working in the sketchbook even while wet media is drying.
I have common themes here throughout most of my sketchbooks like birds trees, other animals and positive phrases.
Usually, I will couple of angel cards with those positive words in my sketchbook with the date. It gives me a starting point, and something to think about. It is fun to look back and see what I was working more each month. I do finish about one sketchbook per month.