gelatin print tips

8 hints for cutting stencils for gelatin printmaking

Post by Linda Germain

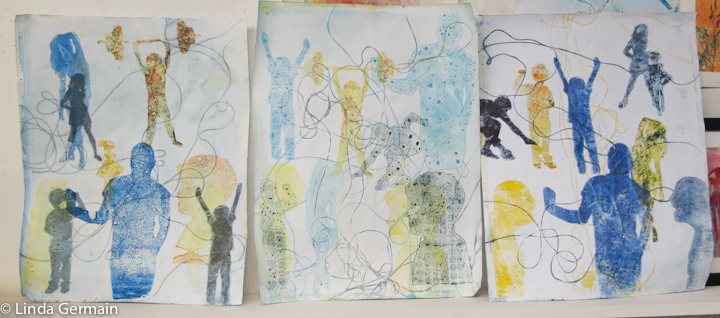
© 2013 linda germain cutting stencils from magazines for gelatin printing

I was flipping through some old magazines looking for some new masking stencils for gelatin printing.  I like people in motion or with interesting negative shapes.  They are harder to find than you think.

Here’s some things I learned about cutting stencils:
  • Use a new sharp razor blade to get smooth cuts
  • Move the paper instead of moving the blade
  • Cut the tiny details first – it is more stable this way
  • Try to keep as many small details as you can
  • look at the image from the backside to check for interesting shape
  • Your scraps may be interesting stencils too.
  • Don’t be afraid to cut past the outline several times when cutting a delicate curve
  • Be open to new images and shapes
Check the current workshop list for a class that would interest you.


8 hints for cutting stencils for gelatin printmaking Read More »

What ink Best for Gelatin Printmaking?

Linda Germain compares inks for monotype printmaking
best inks for gelatin printing – test left to right, Akua Kolor, Speedball, and Daniel Smith water soluble block printing inks.

Some folks have asked me, “What is the best ink for gelatin printmaking?” There is no one correct answer to that question.  It really depends on:

  • your goals and the desired result
  • the paper like to use
  • the weather – hot, cold, humid?
  • how much time you have to let layers dry
  • if you have allergies
  • how much money you want to spend

Best Inks for Gelatin Printing – depends

I did a little experiment with the three inks that I have.  I used the same plate and stencils and compared the results.  It was cool in the studio about 65 degrees.  I did several prints on thin absorbent paper. Above are 3 prints with several layers of “detailed” impressions.
For this application I like the effect Daniel Smith ink on the right, but I am sensitive to the smell of the inks and they take a very long time to dry.
So my next choice it the Akua Kolor on the left, they still have a rich color, dry faster, but they are thin and sometimes don’t hold a stamped impression and they leave lots of ink on the plate.  I have just ordered some Akua Intaglio inks to try out.
For the application above the speedball inks are my least favorite, the one in the middle.  However, I do use these inks all the time.  They are inexpensive and readily available.  They work well for pre-inking stencils. They are super easy to clean up.
Some other options that I have not shown here are golden open acrylic, other acrylic paint, and createx monotype inks.
So to conclude, there is no single answer.  Plenty of experimentation and play will give you the best answer for you.  Happy Printing

 Join a printmaking course

Would you like to explore gelatin printing with the homemade gelatin and glycerin plate check the workshop schedule and sign up.

This is what one student expressed about Make Monotypes, printmaking class:

“Now, I have the confidence to try different printing techniques and to even cut up the gelatin plate to get interesting shapes.” says Lynne P.

Make a Glycerin & Gelatin Printing Plate Now!
Get the FREE recipe to make a gel printing plate

Additionally, you will receive a weekly email about printmaking, ideas, tips and courses.

Join us today and start having fun!


What ink Best for Gelatin Printmaking? Read More »

Why do something scary with your gelatin prints today?

© linda germain 2008 gelatin print with stitching holes

What could be scary about gelatin printing?

Generally nothing, but sometimes fear of ruining a piece or making a mistake creeps in to my head.

That is when I challenge myself to do something scary/brave/risky.

It could be:

  • sewing into the gelatin print
  • tearing the gelatin monotype into shapes
  • spritzing the gelatin plate print with alcohol
  • rolling over the print with a very dark layer of ink or a very light layer of ink
  • turning the print upside down or sideways to change the perspective
  • give yourself unlimited supply of paper and just keep printing without judgement

or

It could be so small that in the end you will wonder why you were scared.

Take a small step in the direction of you goals or desires and you build momentum.  That is why you could do something scary/brave today.

Hey if you do something brave/scary share it, if you dare. 🙂
Happy Printing,
Linda

Why do something scary with your gelatin prints today? Read More »

One Hint for Composing a Gelatin Monotype Print


© linda germain Gelatin print on a dictionary page

I like to just play when I am gelatin printing.  But I do think that I have a few compositional rules in the back of my head that guide me.

One of the rule that I use keep is simple.  Often my gelatin monotypes can get dull, muddy or chaotic.  So I work up lots of prints and learn from each one.  Then take what I learned and create a simplified version keeping the marks that I like and avoiding the ones I don’t like. So If you look at some of my printsyou will see that often I use two colors and 2 to 3 stencils of shapes.

One Hint for Composing a Gelatin Monotype Print Read More »

Great Detail prints with the gelatin plate

Delicate Detail gelatin print  by Linda Germain
Delicate Detail Impression on gelatin plate by Linda Germain

Supplies I used to create this great detail with the gel plate:

  • gelatin plate
  • ink
  • brayer
  • print paper
  • water
  • newsprint
  • plexi plate

The Gel Printing Process

This print is often referred to as the ghost print.  I called it the ghost print too when I first started out.  Ghost print is a printmaker term that is used to describe the light impression that is made from the left over ink after the original print is pulled.  It is very similar to the original but lighter.  I can understand how the term got attached to the second print but I feel that it is really not accurate.  Therefore I refer to this second print as the detail print.  I think that this term is a better description of the second print.

This print is the layer of ink that holds all of the details from the stencils and stamping tools.

So in order to get the detail print you have to pull the shape print first.  After you have pulled the shaped print, remove the stencils, set them to the side.

Get a fresh piece of paper  Place it on the gelatin plate and burnish edge to edge.

Sneak a peek – peel back one edge and see if you have picked up all the ink possible, if not then roll it back down and burnish some more.  Eventually peel off the print and admire.

Dark ink detail prints are easier to see compared to yellow or gold ink prints.
Sometimes I will do a newsprint pick up before I pick up the stencils to get rid of some of the plate ink.  This will give you a clean back ground and increase the contrast.

Pull some fabulous detail gelatin prints and share them with the Gelatin Printmaking Flickr group or the  Facebook Gelatin Printmaking community.  Inspire us!

If you are interested in learning how to create your own fabulous monotype prints with the glycerin and gelatin plate then check out the details of Make Monotypes the online printmaking class with Linda Germain

Great Detail prints with the gelatin plate Read More »