Here’s a method to get the perfect gelatin plate print
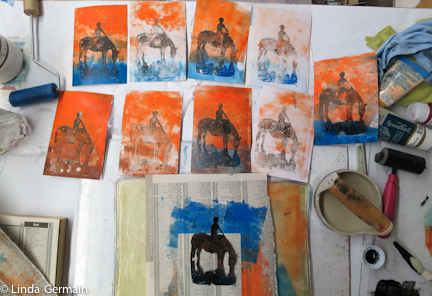
Linda Germain making a series of gelatin plate printsWell, this is the method that I use to create a gelatin plate monotype prints that I would like to sell, frame and share.  I share this picture above which shows you that I make at least 10 prints to get one or two that I really love.  So these are my steps to success –

  1. Find an image that really speaks to you.  This one is my sister on her horse Teddy.
  2. Look at the image as a black and white silhouette
  3. Use photo editing tools or your drawing skills to simplify the image, but try keep some of those important details
  4. You will find lots of videos on line to help you create  the image
  5. Give yourself a break and allow our first few to be less than “perfect”
  6. Use the pre-ink the stencil method to create an image like the ones above.  You have many other options this is just one way.
  7. Use paper and ink that allow you to create with abandon.  Be generous to yourself.
  8. Then start making prints
  9. Look at and identify what you like and put that mark into the next print
  10. Let go of the parts/marks that you don’t like
  11. Make at least 10-20 prints

If you follow those steps I am sure you will create some pleasing gelatin plate prints that you are happy with.
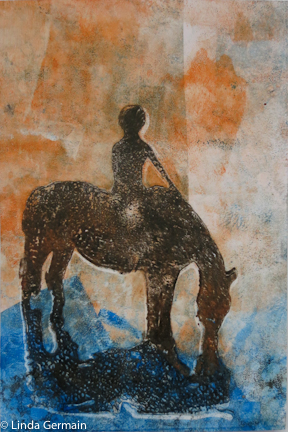
gelatin plate print by linda germain

For example

  • I found the photo of my sister
  • Used photoshop and Silouhette – cameo to cut it out.  Borrowed the machine from another sister.  Oh dear – I am loving it.
  • The images I printed go left to right and bottom to top.  So you may notice a progress.  Notice what marks I liked and kept for the later prints.
  • I liked the dark horse shape
  • I added browns and  blues to the horse shape
  • I made the watery area blue
  • I like the lighter orange
  • I liked the more mottled or textured background
  • I liked the horse lower on the horizon line.

The things that I let go of were –

  • solid black silhouette
  • very centered image
  • flat colors

I would summarize this gelatin printmaking method as “print a lot and keep what you like.”  I invite you to try it and let me know if you like it.

Happy Printing!

Here’s a method to get the perfect gelatin plate print Read More »
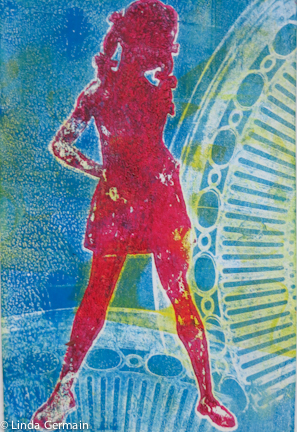
Secrets for Powerful Gelatin Prints

  • gelatin print by linda germainPlay a lot!
  • Make lots of prints
  • Find what you love
  • Apply some design concepts
  • Create a focal point

So those are my secrets for gelatin printmaking.  Try it an see what happens.  Then share your success or challenges with the Flickr group.


Small Gelatin Print here-

  • Three layers of primary colors
  • stamping tool to lift off ink – geometric design
  • underlying layer of yellow something
  • pre-inked red figure to create a focus
  • notice the placement and division of space

Do you think this gelatin plate print works?  Do you find it interesting?


If you would like more help or tips for gelatin printmaking then check out these pages

FAQ page for gelatin printmaking

A video and 3  helpful hints

Quick Links to gelatin printmaking help

Secrets for Powerful Gelatin Prints Read More »

a few Gelatin Printing Steps

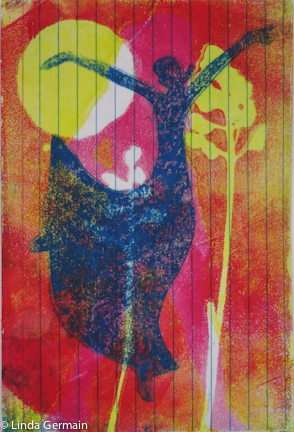
Shaped layers in this Gelatin Plate Print by linda GermainShaped layers in this gelatin plate print. Sometimes it is hard to look at a gelatin print and remember what I did. This one was created in 3 pulls.

Gelatin Printing Steps

  • layer of magenta with a circle masking stencil, and 2 pieces of grass
  • layer of yellow ink with a unrecognizable masking stencil
  • Pre-ink the dancer stencil
  • Place ink side down on the gelatin – to release the ink on to the gelatin plate
  • then print the dancer on to the index card.

I like the –

  • lines of the index card showing through
  • the strange combination of images
  • bright colors

I am finalizing a new video.  Sign up for the newsletter and be sure to see it.

Happy Printing!


a few Gelatin Printing Steps Read More »

Multi-colored Gelatin Plate Monotype in one step

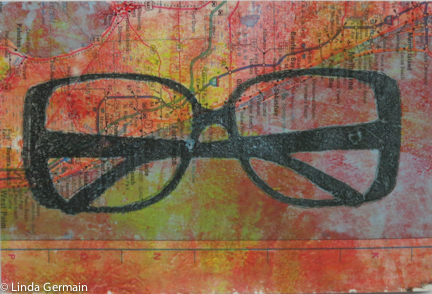
gelatin print by linda germain on map

I say one step but a more accurate word would be a multi colored gelatin plate monotype print in one pull.  There are lots of preparatory steps to this gelatin print.

  • cut and gather the map pages
  • pre-ink the glasses stencil with black/blue ink
  • set the stencil ink side down on the inked plate
  • pull a shaped print on another piece of paper
  • do a newsprint pick up
  • Roll the orange/yellow ink over the glasses stencil and on to the gelatin plate
  • carefully remove the glasses stencil from the gelatin plate
  • Place the map page on the plate and burnish
  • Sneak a peek to see if you have picked up all the ink possible
  • peel off and admire your gelatin plate monotype print

As I said yesterday, I like to make a lot of  gelatin prints to get a few great ones.  So when I made this print, I had to make several to produce a few awesome prints.  The less than lovely ones always have potential to become something else.


Embrace the freedom to experiment with your ……………

Gelatin Plate Monotype Prints today!

Multi-colored Gelatin Plate Monotype in one step Read More »

a female figure in this gelatin print

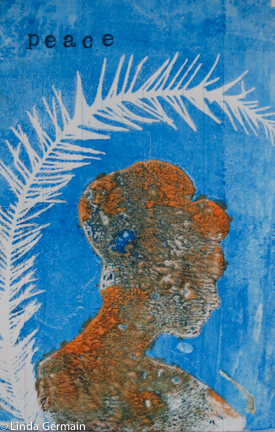
gelatin printmaking with linda germainI am in a simple mode these past few days and that is reflected in the gelatin  prints that I am sharing with you.

This Gelatin Print contains:

  • delicate bird feather as masking stencil
  • female profile stencil
  • hand stamped text

I used the pre-ink the stencil method to get that orange/brown/blue in the correct spot of the female silhouette.

I use that pre-ink method because I like the mottled texture that I get with the process.  It is not an exact technique  and it works differently with each

  • different ink,
  • paper and
  • printing surface.

Have a peaceful day!

a female figure in this gelatin print Read More »