Why Keep it Simple?

simple gelatin print by linda germain
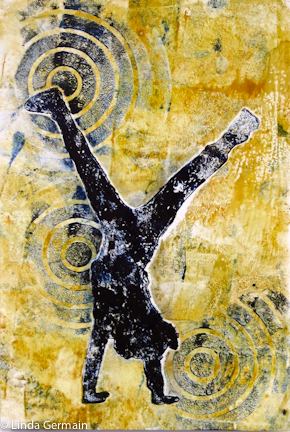
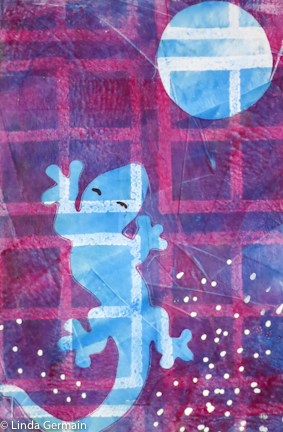
Simple sometimes works.  This ICAD gelatin print is just one stencil and a bit of magenta and blue ink.

Chaos or Simplicity?

Everything is moving so fast,  so much to do and see and be.  Don’t you just feel your body relax when you see a clean organize monochromatic space on pinterest or in a blog post.

I do.  I move back and forth between chaos and simplicity.  If you saw my studio right now you would seriously wonder if simplicity was possible.

If you keep things simple:

  • decisions are easier
  • choices are clearer
  • thoughts are less frantic
  • the body can rest

When you look through your pile of gelatin prints which ones are you drawn too?  Are they the simpler ones or the chaotic prints?

When you choose colors do you have 2 or 3 go to colors or do you use every single one in every print?

There are no wrong or right answers.  There is just observation and information that you can use to enhance your printmaking process.

Happy Printing!


Why Keep it Simple? Read More »

Experimenting with Inks, paints and types of gelatin plates

gelatin plate print with Daniel Smith inks and a gelli plate by linda germainI am in the studio listening to country music and trying to understand the difference between all the types of gelatin plates and how they interact with different paints and inks.

“Gelatin” Plates that I have:

Inks/Paints I am using:

  • Speedball water based inks
  • Daniel Smith water-soluble inks
  • Golden Open Acrylics

My gelatin and water printing plate was very old and on its last leg so I had to toss it and now I am waiting for a new one to harden in the refrigerator.

I will have to do a video of this comparison experiment some time soon.  All that I can say at this point is that

  • with each variant, you will have a different type of impression/monotype print.
  • weather is a factor for most the material plates and inks/paints
  • I will probably never have a definitive answer, so
  • It will come down to using what I have available at the time and
  • the desired type of impression that I am hoping to create.

I will always love the quality and richness of the Daniel Smith Inks, but I am sensitive to the oil in them.  The print above was made with the Daniel Smith water-soluble inks and the gelli plate.

Sign up for the newsletter here to stay informed.

Happy Printing!

Experimenting with Inks, paints and types of gelatin plates Read More »

Drawing to improve your Gelatin Print

2 step gelatin print by linda germainButterfly stencil for this quick gelatin print.  I did this in 2 simple steps.

Tools for this Gelatin Print

  • sponge mop head as stamping tool
  • potato masher as a stamping tool
  • Butterfly stencil
  • white pen, or marker
  • gelatin plate
  • orange and magenta speedball ink
  • brayer
  • palette
  • index card

Steps to Make the Monotype print

  1. Roll orange ink on the plate
  2. Mark into the orange ink with the sponge mop head
  3. Print the orange layer onto the index card
  4. Roll out the magenta ink
  5. “Stamp” into the ink to with the potato masher to remove some magenta
  6. Place the butterfly stencil on the magenta
  7. Put the print paper on top and burnish
  8. Then use the white pen, paint or marker to add the circles.

If you are just getting started with gelatin printing this is a good way to get started.  You use both of the main tools that I use in gelatin printmaking, masking stencils and stamping tools.

Another helpful hint to getting started is to watch my videos, make a plate and start experimenting.

Drawing to improve your Gelatin Print Read More »

Link Love on Fridays

This project gets me out looking for inspiration. My first inspiration is a realism painter with a twist Debbie Shirley.  She does neon signs, old car and fruits and veggies.  I think she can bring just about anything to life.

http://debbieshirley.blogspot.com

Number 2 for this week  is Randal Plowman’s blog – a collage a day.  He has been my inspiration for daily doings for a long time.

http://acollageaday.blogspot.com
http://acollageaday.blogspot.com by Randal Plowman

Number 3 fabulous blog Terri Stegmiller Art Quilts, surface design, quilting, thermo fax, stencils and cats!  She surprised me with a gift a few months back.  Check out her whimsical style.  I am sure you will smile.

http://stegart.blogspot.com

Number 4, Alyson Stanfield is always giving away helpful information for artists in business.  She is a business role model and has lots to offer artists and other creatives.

http://www.artbizblog.com


Number 5 blog for this week is Amy Hood Arts, she has selection of tutorials, a lot of info about working with kids and homeschooling

http://amyhoodarts.com

So click on the header images above and be inspired.

Stay Cool!

Link Love on Fridays Read More »

How to Make your Gelatin Print POP

Make your Gelatin Print POP by linda germainSometimes your gelatin print or any mixed media piece just needs that extra pop to make it come together.  Today I share with you a few tips on how I get my monotype prints to stand out:

  1. Use bright pigment rich colors to start with because as you layer the colors  they can mix and become dull.  (This will depend on what inks/paints you use.)
  2. Try to keep a good range of values from very light white to very dark black.
  3. Look at your print and ask, “Could I add an extremely dark or light mark to bring it all together or finish the print?”

I did this in the ICAD print on the right-

  • I used unmixed colors just out of the tube. (you don’t alway have to do this)
  • The range of value is pretty good from light lights to dark darks
  • Then I added the black marks for the eyes with a sharpie and the white dots with a corrective pen.
  • I think these tiny marks kind of balance off the bold shapes of the rest of the piece.

If you have not watched my recent video about masking stencils and layers when gelatin printing, then please check it out here.

Happy Printing!

How to Make your Gelatin Print POP Read More »