What ink Best for Gelatin Printmaking?
Linda Germain compares inks for monotype printmaking
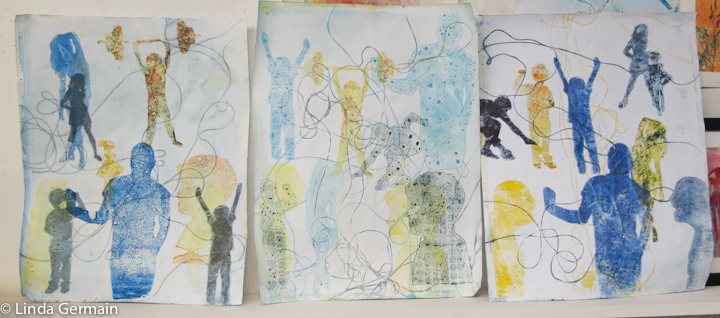
best inks for gelatin printing – test left to right, Akua Kolor, Speedball, and Daniel Smith water soluble block printing inks.

Some folks have asked me, “What is the best ink for gelatin printmaking?” There is no one correct answer to that question.  It really depends on:

  • your goals and the desired result
  • the paper like to use
  • the weather – hot, cold, humid?
  • how much time you have to let layers dry
  • if you have allergies
  • how much money you want to spend

Best Inks for Gelatin Printing – depends

I did a little experiment with the three inks that I have.  I used the same plate and stencils and compared the results.  It was cool in the studio about 65 degrees.  I did several prints on thin absorbent paper. Above are 3 prints with several layers of “detailed” impressions.
For this application I like the effect Daniel Smith ink on the right, but I am sensitive to the smell of the inks and they take a very long time to dry.
So my next choice it the Akua Kolor on the left, they still have a rich color, dry faster, but they are thin and sometimes don’t hold a stamped impression and they leave lots of ink on the plate.  I have just ordered some Akua Intaglio inks to try out.
For the application above the speedball inks are my least favorite, the one in the middle.  However, I do use these inks all the time.  They are inexpensive and readily available.  They work well for pre-inking stencils. They are super easy to clean up.
Some other options that I have not shown here are golden open acrylic, other acrylic paint, and createx monotype inks.
So to conclude, there is no single answer.  Plenty of experimentation and play will give you the best answer for you.  Happy Printing

 Join a printmaking course

Would you like to explore gelatin printing with the homemade gelatin and glycerin plate check the workshop schedule and sign up.

This is what one student expressed about Make Monotypes, printmaking class:

“Now, I have the confidence to try different printing techniques and to even cut up the gelatin plate to get interesting shapes.” says Lynne P.

Make a Glycerin & Gelatin Printing Plate Now!
Get the FREE recipe to make a gel printing plate

Additionally, you will receive a weekly email about printmaking, ideas, tips and courses.

Join us today and start having fun!


What ink Best for Gelatin Printmaking? Read More »

Why do something scary with your gelatin prints today?

© linda germain 2008 gelatin print with stitching holes

What could be scary about gelatin printing?

Generally nothing, but sometimes fear of ruining a piece or making a mistake creeps in to my head.

That is when I challenge myself to do something scary/brave/risky.

It could be:

  • sewing into the gelatin print
  • tearing the gelatin monotype into shapes
  • spritzing the gelatin plate print with alcohol
  • rolling over the print with a very dark layer of ink or a very light layer of ink
  • turning the print upside down or sideways to change the perspective
  • give yourself unlimited supply of paper and just keep printing without judgement

or

It could be so small that in the end you will wonder why you were scared.

Take a small step in the direction of you goals or desires and you build momentum.  That is why you could do something scary/brave today.

Hey if you do something brave/scary share it, if you dare. 🙂
Happy Printing,
Linda

Why do something scary with your gelatin prints today? Read More »

Make a Prayer flag w/ Gelatin Prints


© linda germain – pray flag from gelatin plate monotype prints

A couple of weekends ago a few fabulous fiber gals from the lowell fiber studio came over to my workshop for a day of gelatin printing on fabric.  Then  they kindly invited me to a fiber feast at their studio, a delicious pot luck, good discussion and sharing of work.

This challenged me to do something with my gelatin prints on fabric.

I did a little research about prayer flags and want to keep it simple and retain some of the traditional symbolism.  To make the flags –

  1. Found prints in the 5 colors, blue, white, red, green and yellow
  2. Did a little touch up printing with and old gelatin plate to get the colors stronger
  3. Cut the 5 flags all the same size
  4. I wrote some stream of consciousness “prayers” about the 5 elements, sky, air, fire, water and earth, on the surface of the flags.
  5. Machine sewing  to reflect the energy of the element
  6. Topped them all off with the dragon fly thermofax screen print
  7. Strung them on a cord
  8. Hung them in front of my window to enjoy
I read that a sunny windy morning is the best time to hang a prayer flag.  And that is just what I got today!  I can’t wait to watch the flags slowly deteriorate and the prayers go into the wind.
See more about the Lowell Fiber Studio

Make a Prayer flag w/ Gelatin Prints Read More »

Gelatin Printing on a large plate 16 x 20

© linda germain 2013 small, medium and “large” gelatin plate prints

It is hard to judge scale with online pictures so I laid out some prints of the size that I usually do on the right side, the ferns and the grasses. That way you can compare the 16 x 20 size of the prints with the figure.

Today I used the akua color inks.  I found that I could pull several images from just one inking of the plate.  That is nice because often the delicate light ghost images can create another level of interest in a gelatin monotype print.
Check out the flickr group and share some gelatin prints.
or if you prefer Facebook then like the gelatin printmaking page
and start a conversation.
If you are looking to take a class please check out my current schedule of gelatin printmaking classes.

Gelatin Printing on a large plate 16 x 20 Read More »

Gelatin Plates for every size project

© linda germain 2013 Gelatin printing plates in different sizes

The picture shows you

  1. tiny round gelatin “plates” that I made in a cupcake pan, (top left),
  2. the 5″ x 7″ gelatin plate that I made in a recycled styrofoam produce tray ( bottom left)
  3. the  10″ by 13″ that a formed in the cookie sheet from the dollar store (middle)  this one is quite old and falling apart but I love that and finally
  4. the 16″ x 20″ gelatin printing plate that I made  in an old picture frame lined with thick 4 mil. plastic.  See the picture below for the “form”
The 10 x 13 is the standard size that I use.  It is big enough to use medium size stencils and offers a lot of options as far as design and composition.  It fits easily in the refrigerator.  It works well will standard 9″ x 12″ paper.
I had some fun inking and hand printing the tiny round pieces.
The produce tray size is good for cards and takes up very little space in the refrigerator. This one is about a month old.  It is easy to melt it down in the microwave and reshape it too. Video here
The 16″ x 20″  is an experiment to see how it would be printing on that size and to see if I could even do it.  It is cold in the studio so I am just leaving it out.  Maybe 55 degrees fahrenheit.  Here’s a picture of the picture frame and plastic form.
The frame is an inexpensive metal frame that I had in the studio.  You could use whatever you have laying around to create a well.  I left the glass in the bottom and I taped strip of mat board around the edge to keep the plastic straight.  The next day I just lifted the plastic right out of the frame/form. Video here.  Please note that I used heavy duty plastic for the 16 x 20 gelatin slab.
Share a picture of your gelatin plate with the gelatin printmaking flickr group or Facebook page
Happy Printing

Gelatin Plates for every size project Read More »