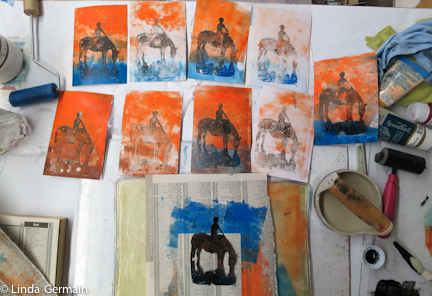
61 Gelatin Prints in 61 Days – Done
 I did it! What a great community and leader in Tammy Garcia at Daisy Yellow. I did the ICAD challenge and have the gelatin prints on my wall to admire. These are some discoveries I made:
- I like working small on a pre-cut size of paper
- I like working in a series
- I like the new gelatin, glycerin and water plate
- It takes time to create, photograph, post and share
- Goals and boundaries help me.
I have added a picture below of the materials I used to make my second gelatin, glycerin and water plate. I have not printed on this one yet but the consistency feels good, flexible, soft and spongy but not too fragile. So you could quite easily make this plate for yourself and be gelatin printing for months to come.
For this 5″ x 7″ gelatin, glycerine and water plate I used
- 1/2 cup of water
- 1/2 cup of glycerine
- 1 box of gelatin
- 5″ x 7″ acrylic box frame.
It was a little tricky for me to make in such a small quantity. It got quite foamy. I followed my basic instructions and dissolved the gelatin in the 1/4 cup of cold water then added 1/4 of boiling. Stir with rubber spatula to dissolve and added the 1/2 cup of glycerine. I think it is ok to microwave it for a few seconds to help things dissolve.
It sets up really quickly. So there is little time to skim bubbles like in my first video. I think I will try adding a little more water next time. Or maybe a different pan. The deep acrylic box frame is a great shape and size but I have a hard time getting the plate back in it for storage and a hard time skimming off the foam and bubbles. Maybe I will dissolve the gelatin in the glycerin first and then add boiling water. I think that is what Lindsay , the frugal crafter did.
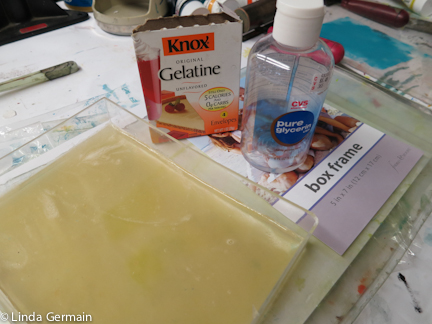 I would definitely NOT put any gelatin, glycerin and water mixture down the drain. I think it will harden and clog the drain. So clean your tools with paper towels and then lots of very hot water.
I found this everlasting gelatin, glycerin and water recipe over at the FrugalCrafter. I found another recipe that added a bit of sugar to preserve the plate. There is a full discussion of the questions that folks ran into and Lindsay has provided lots of advise. So I would check out her post above if you have any questions.
I do leave this gelatin/glycerin plate out on my work table and it has lasted quite a while. I have melted down another one that I made and reshaped it. It does not seem to be as affected by the weather as the gelatin and water only plate. I am becoming a be fan of this recipe.
Aine Scannell over at the gelatin plate flickr group is looking for ideas on how to make a really big gelatin, glycerin and water plate. I can’t wait to see what she comes up with.
Enjoy!
61 Gelatin Prints in 61 Days – Done Read More »